Sunday, February 10, 2013

Paint Splatter

I search the web high & low to find a great technique to apply a paint splatter to my projects.  The brush technique is really messy.  The spray can drops were smelly.
While looking for a solution, walking through a Dollar Store; I saw a 4 oz baby bottle. The image of my children walking around the house with their bottle up-side down dripping came rushing through my mind.  I thought, "That should work!"

This was the first attempt with the "baby bottle technique"  I only applied one color.  I plan on adding more. 
I found a "Antique Copper"  METALLIC paint at Walmart.  I filled the bottle 1/2 way with water.  I added 5 GLASS BEADS for shaking.  (Plus the glass beads help with slowing down the flow from the nipple)   I poured almost all of the paint into the bottle.  You can adjust your recipe, I do not think it matters very much.   
Glass Beads - Cheap
Please leave me a comment to tell me what you think.
Cricut:  PRINT text & CUT shape


1)      Pick a frame for your project.  Mine was from a garage sale for $2.00  (30 inch x 24 inch)
 Cut out several shaped “frames” from the “Elegant Edges” Cartridge. (or any other cartridge you have)
a.       Cut out a variety of sizes out of  8.5 x 11 card stock.


CUT:  Name out with “Extreme Fonts” Layout the design on the Picture Frame.
1)      Pick your favorite quotes
2)      Type up the quotes
I used a verity of fontsAdd caption
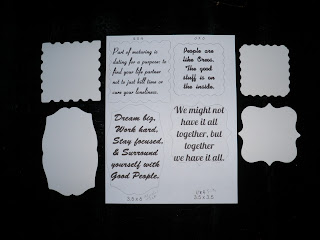
Here is the tricky part:    Cutting the shapes around the Printing!!!

1)      Take the cardstock shape & center it a round the TEXT.
2)   Draw an outline around the TEXT.  Make sure no outline touches the other outline.  OR the layout is off the page.  You may need to make adjustments to the TEXT to make the layout does not overlap.  


HINT:  I was very helpful for the Craft Room layout when the shapes were placed with distinctive reference points.


3)  Sample CUT: I had several problems with this sample test cut.  One of the shapes cut off the page.  Plus the text did not fit inside the shape.  I made the changes to adjust the text smaller plus & increased the shape a little bit.
 4)  After the adjustment the next PRINT & CUT turned out great.
Picture:  I added a little ink around the edges so you could see the cut.

Wait for the finished project!!!

Monday, April 25, 2011

use ALL of your LIPstick

LipStixRemix

I thought this was a great invention when I saw it on "Shark Tank"
If you have several LipSticks at the end of the container.  BUT YOU STILL LOVE THE COLOR!
This is how you can continue to use an old favorite color

Wednesday, March 9, 2011

CupCake Party idea's

globalsugarart.com


WOW !!  I can not believe how many designs I have found for Cup Cakes.

Cup Cakes will never be the same.
 CupCake Wrappers

Make your own::
http://megardengal.blogspot.com/2012/05/making-perfect-cupcake.html


http://cricutcakecutter.com/

Followers